
With three consecutive Super Rugby titles in the last three seasons, its no wonder that there’s lots to like about the Crusaders. Everything from their ability to seemingly score from anywhere, to balance free-flowing rugby with canny tactical kicking or their aggressive ball-focused defence that rarely lets up. This article will however focus an another less obviously impressive area of their game – where they haven’t conceded a try in over three years. This article takes a looks back at the 2019 Super Rugby Final against the Jaguares and specifically, the Crusaders lineout maul defence.
Setting the scene
Before we take a deep dive into the Crusaders maul defence itself, it’s worth first setting the scene a little for the 2019 Super Rugby Final and talking about their opponents – the Jaguares.
As our article on their attacking maul earlier last month indicated, the Jaguares are 2020’s best mauling team in Super Rugby by some distance and have statistically been one of the best Southern Hemisphere clubs in this department for some time. Julian Montoya – the Jaguares sub hooker who will feature more later on in this article – had scored 6 tries alone from maul platforms in 2019 going into the Crusaders game.

So, how did the Crusaders stop this fearsome Jaguares maul and keep the streak alive? Let’s take examples from three different lineout maul situations to find out.
Lineout 1: The ‘C’ maul defence
With the Crusaders playing that canny kicking game early doors that we alluded to in our introduction, the Jaguares didn’t get themselves into an ideal attacking position to maul until the 29th minute of the final.
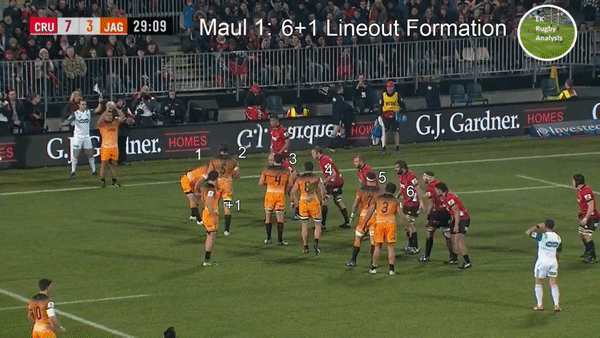
As we can see in the picture below, the Jaguares initially set their lineout in a 6+1 formation. What this essentially means is that, instead of having a 9 in the traditional scrum-half position beside the lineout, there’s a forward there instead.
Why do the Jaguares do this? Putting it simply, having a forward in the scrumhalf position allows them to form the maul faster.

From a Crusader’s perspective, what should interest us most about this picture initially is the body language of the Jaguares players. Only one Jaguares player is in position to be a front lifter and every other player in orange is looking to the front of the lineout. Everything suggests that the throw is going to the front and the Crusaders bank on that.
Rolling the clip on, we can see that the Crusaders have read the Jaguares intentions correctly. Also anticipating the maul, the Crusaders chose not to jump because an unsuccessful contest in the air could potentially see them lose three ‘pushing’ players to a lifting pod.
What we want to focus on however, is what the Crusaders do as the Jaguares take the ball in the air.
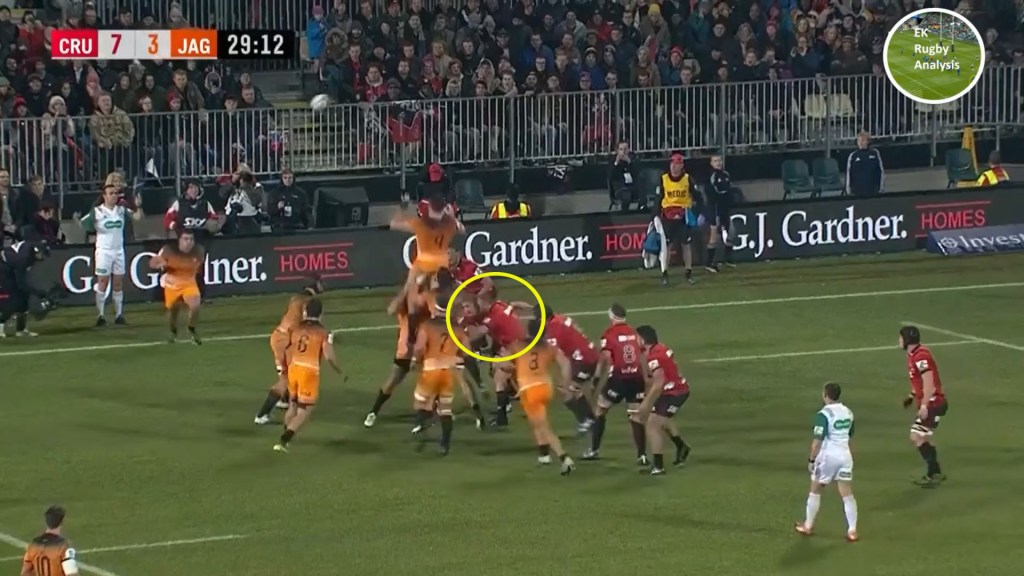
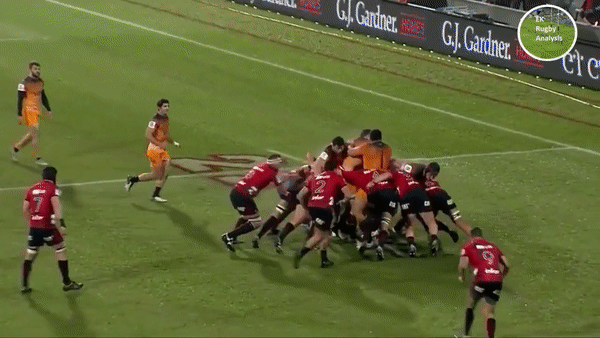
If we turn our eyes to the area circled in the picture above, Joe Moody, Mitchell Dunshea and Owen Franks can be seen binding together in the same manner that a front row does at a scrum.
Taking the still below from two seconds later, we can see that Sam Whitelock and Kieran Read bind on their teammates for a second shove by linking arms too, creating a ‘C’ shape that envelopes the front of the Jaguares maul and drives them towards the touchline.
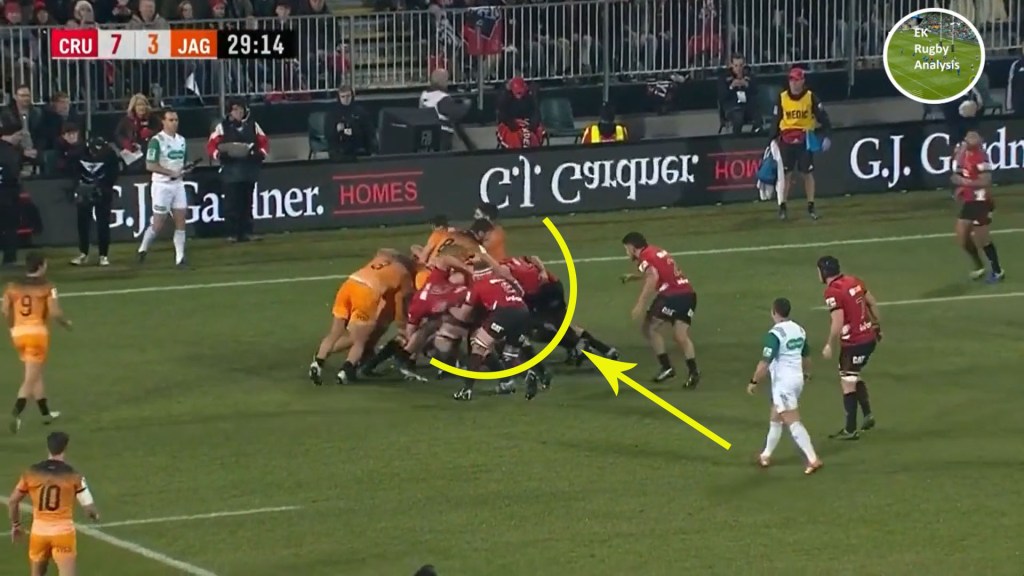
In a similar way to deciding to stay on the ground instead of jumping initially, the Crusaders ‘C’ defence is based on a more pragmatic approach to defending the maul once it begins to be formed on the ground.
Whereas some teams will employ an individual player to try and tackle the jumper once they land, the Crusaders choose a less high-risk option by binding together before the opposition set and using their strength in numbers to halt the shove. The benefit of this approach is that the Crusaders are often moving forward before the opposition even get set.

If we take a look at the maul above, we can see just how successful this approach is, with the Crusaders completely put the brakes on the Jaguares drive and blocking the Argentinian maul from moving forward in any direction.
Examining the defence of this first lineout maul from another angle, see how the Crusaders initially bind in a ‘C’ shape together…

before tightening the ‘C’ like a vice to bite into the arrowhead of Jaguares maul and separate the lifters from the jumper.
Despite the success of the Crusaders maul defence here, the Jaguares would back themselves and continue to try and impose their mauling game on the New Zealand side.
Lineout 2: Defending on the fringes
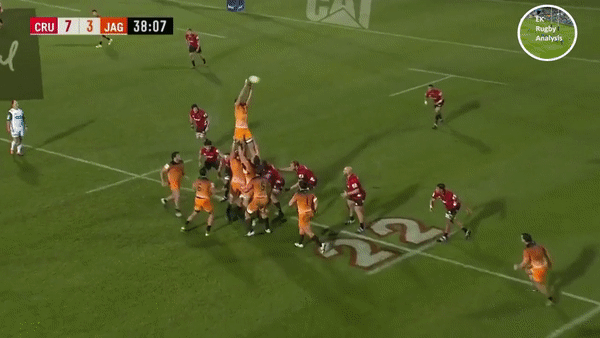
At this second lineout, we see a different area of the Crusaders maul defence tested as the Jaguares adopt the now familiar 6+1 formation again.
Although the formation is the same, there are two subtle differences at this Jaguares lineout. For one, Pablo Matera in the ‘+1’ spot is looking at the middle of the lineout this time. Secondly, there is a late switch with Guido Petti turning and lifting Javier Ortega Desio beside Matera.

On the Crusaders side of the ball, they read this body language, again anticipating the destination of Agustín Creevy’s throw and the intention to maul from the middle.
As a side note, a small detail from the still above helps the Crusaders counter-drive set faster here.

By reaching out and getting their hands on the Jaguares players early, the Crusaders defenders can react instinctively to their counterparts movements as they put their heads down. This allows them to drive more quickly without having to keep a constant keep eye on the opposition.
Moving the play along a few seconds to when the Jaguares maul is set, below we can again see the Crusaders ‘C’ in action. In addition, Codie Taylor and Owen Franks defend the edge of the maul on either side. With the throw going to the middle, this defensive setup gives the Crusaders cover regardless of which side the Jaguares attack next.

As the live clip of the maul below shows, after being driven back initially, the Jaguares look to attack the fringes on Taylor’s side.
Due to the strength of the Crusaders ‘C’ drive, Taylor can confidently push off the line to support Matt Todd.
After a well-crafted Jaguares play that puts Matías Moroni on the front-foot, Taylor even ends up making a covering tackle to help his defence reset – all thanks to that initial strong ‘C’ drive.
Lineout 3: Slowing down the slide
The Jaguares would use a 6+1 formation before every lineout maul in this game. On this occasion, the Argentinian side slow down their throw in with a series of feints that clearly leaves Sam Whitelock exasperated.
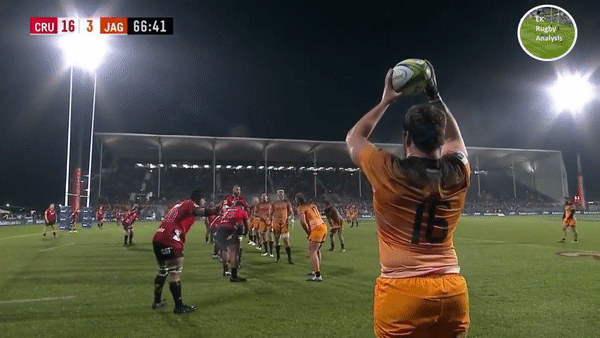
As we watch the maul being set in the next clip below, keep an eye on the actions of the two hookers – Montoya in the orange 16 jersey and Andrew Makalio in red – and how the Jaguares maul subtly changes direction once Argentinian international joins it.
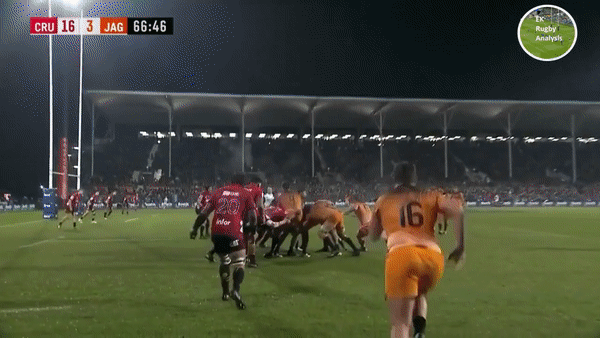
After an initially successful counter-shove from the Crusaders, the slide right is initiated by Montoya deliberately changing where he puts his head in. This takes the Jaguares maul out of the mouth of Crusaders ‘C’ defence and allows them to move forward.

Seeing what is going on, Makalio looks to slow the slide by putting his own head down and driving towards the touchline.

As the clip and picture below illustrates, Makalio is successful in doing this and shows impressive strength to get low and push the Jaguares maul back into the teeth of the Crusaders ‘C’ defence.
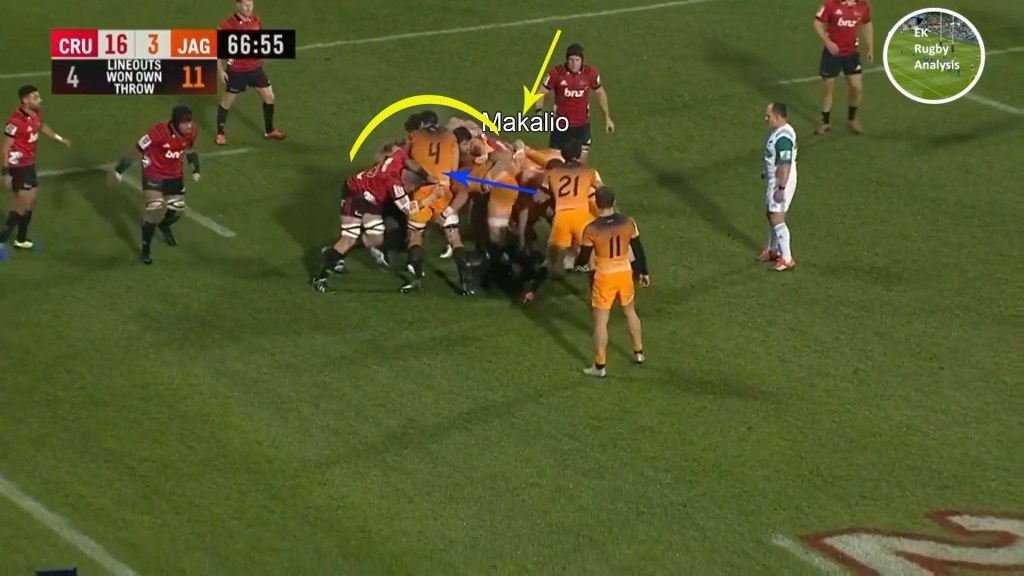
Now heading sideways towards touch, the eight-man Jaguares maul has been nullified again by the six-man shove and Crusaders ‘C’ defence.
<->
While their flashes of brilliant attacking play can be a marvel to watch at times, it’s the Crusaders consistency that has often set them apart for the last three years. Built on pragmatic decision-making and crushing drives with a capital ‘C’, few areas of their game exemplify that consistency more than the Crusaders maul defence.
<->
If you want to read some of our other posts on the website, you can click on the ‘Index’ icon at the top of the page to see a list of all the other analysis pieces on the site. Thanks for reading, EK.
Support EK Rugby Analysis
If you would like to financially support the work we do, you can do so with this PayPal link – paypal.me/ekrugbyanalysis1 – or click below to donate €2.
Support EK Rugby Analysis
If you enjoy what we do and would like to support EK Rugby Analysis, you can click below on your preferred method of payment to donate €2
€2.00
