
After a season away from Champions Cup rugby that produced a Challenge Cup win and an appearance in a Top 14 final, Clermont Auvergne came back with a bang in their 53-21 win over English side Harlequins over the weekend. This analysis will focus on Clermont’s attack and how a smart kicking game can both create and exploit the space in a backfield defence.
<->
While there always needs to be a degree of pre-game planning for any team when looking to attack an opposition, taking advantage of the opportunities a defence gives you in real-time during a game is often as, if not more, important when teams have the ball.
Keeping this in mind, this article will first look at how Harlequins defend and where the spaces are in their structure.

As the man who christened the Saracens defence ‘The Wolf Pack’ in his time there as a coach, it’s fair to say that Quins Head of Rugby Paul Gustard likes a rush defence.
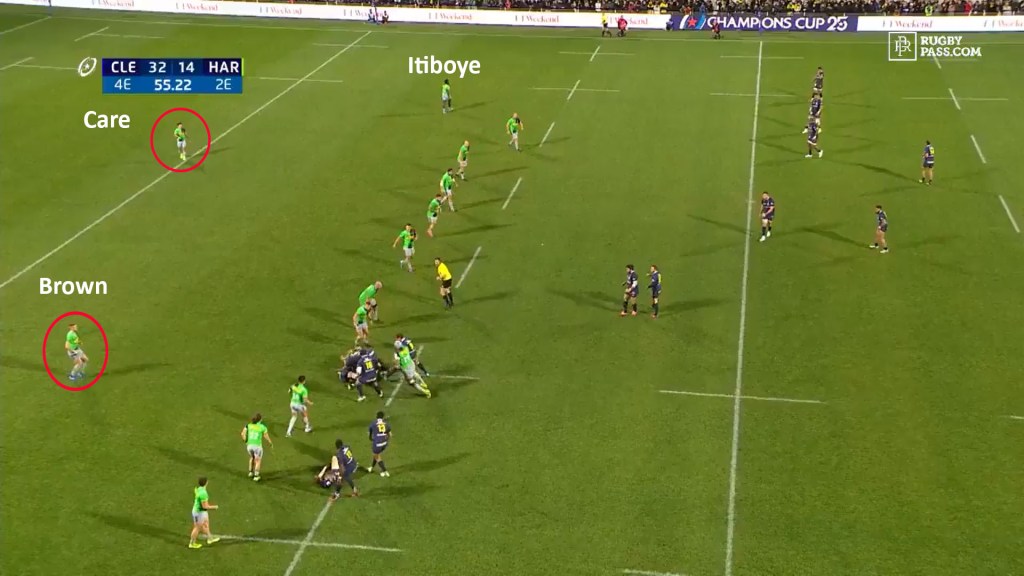
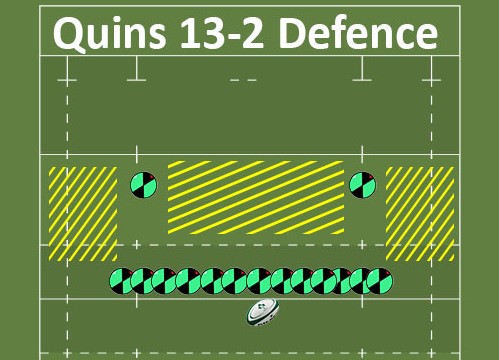
As we can see in the picture below, like many rush defences these days, Quins operate with a 13-2 defensive structure. What this means is that they always look to have 13 defenders in the front-line and 2 covering in behind on either side of the pitch.
There are a couple of details to note here.
- The 2 defenders dropping back for Quins regularly rotate, with one of the 9, 11, 14 and 15 filling the role at different times during the game. In this example it’s fullback Mike Brown and scrum-half Danny Care.
- The openside winger will often stand a little behind the rest of the front-line to cover cross-field kicks when the ruck is in the far 15 metre channel. Gabriel Itiboye is the man in this instance above.
While Clermont don’t kick in the following clip, it gives you an idea of how Harlequins cycle through backfield defenders. In this example, Care moves back at the top of the clip, and then swaps with Itiboye, as Mike Brown has to step up on the left wing later on to keep the 13-2 shape.
Now that we’ve established how Harlequins defend in the backfield, let’s see how Clermont take advantage of this.
<->
Our first example of Clermont’s attacking kicking game is in the 18th minute; with Les Jaunards 10-0 up after an intercept try from winger Alivereti Raka and a penalty kick.
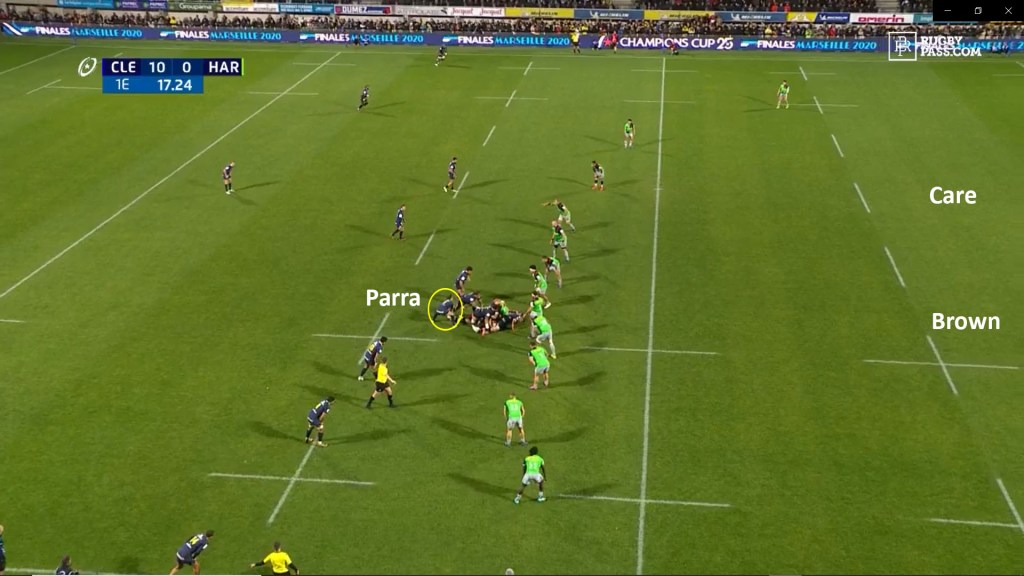
Following a slow ruck, Morgan Parra lines up for a box-kick with Care and Brown out of shot. Considering Harlequins’ comfortable defensive position, Parra is going to have to give his chasers a chance here to win the ball back.
The ideal execution of a box-kick is that it has approximately 4 seconds of hang-time in the air and the ball travelling around 20 metres; this gives the chasing catchers time to compete for the ball and win it back.
As the clip above shows, Isaia Toeava does just that and win the turnover off Parra’s textbook effort.
A knock-on effect of this box-kick is that it not only gives Clermont the ball back, but also compromises the Quins backfield defence.
As the ball is about to be moved into midfield on the next phase, the Quins backfield defence should look something this graphic above.
This is the best area for kickers like Clermont’s Camille Lopez to kick from as the wingers on either side of the frontline have to rush up to cover any potential passes, leaving space in behind.
This next picture is what the Harlequins backfield defence actually looks like following Parra’s box-kick.

With fullback Brown now at the bottom of the ruck, there is a mix-up in the Quins backfield defence between Care and Itiboye and the winger is left on his own covering 35 metres of space on either side of the pitch.
Lopez-circled in the middle of the pitch-spots this and, facing every 10’s dream of a kicking scenario, calls for the pass.
It’s worth noting that Raka does a great job of staying wide here so that he can see the flight of Lopez’s kick as it travels across the pitch. James Lang by comparison lose’s sight of the ball as Lopez’s kick goes over his head, allowing Raka time to claim the ball and offload. Peceli Yato’s athleticism takes over from there and Marcus Smith just isn’t heavy enough to stop the Fijian flanker scoring.
Yato’s try is a fantastic example of Clermont first creating space in the backfield with the box-kick, and then exploiting it to score with the kick-pass to Raka.
<->
Considering the joy that Clermont get from moving the ball into midfield before kicking, it’s unsurprising that they try it again in the 61st minute.

Clermont are in full-flow at this stage of the game and, 32-14 up, create another linebreak after Lopez puts Clément Lanen into a gap.
As some of you may have noticed, Mike Brown goes down injured at the end of the clip after getting his head caught on the wrong side of a tackle on Clermont’s Peter Betham.

Lopez spots this too as George Moala looks to take the ball into contact on the right side. Recognising that this may present another kicking opportunity, Lopez calls for the ball in midfield from the next ruck.
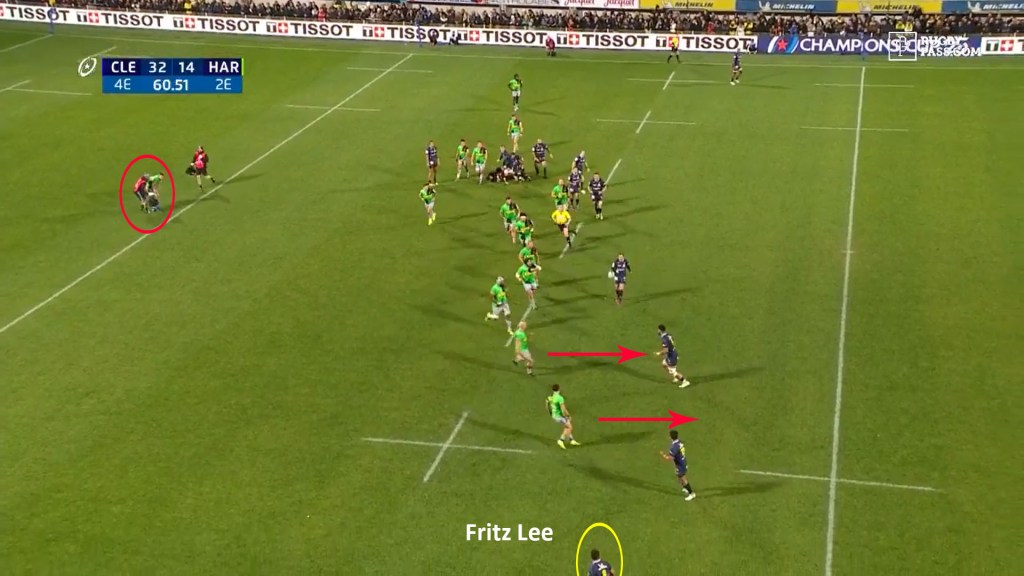
As Harlequins rush up to cover a potential pass from Lopez on the outside, it leaves Fritz Lee open on the left wing and the Clermont 10 picks him out with another perfect kick-pass.
Although Quins do manage to get 2 defenders in the backfield this time, the quality of Lopez’s kick, Raka’s pace and Brown’s injury result in another Clermont try.
<->

Having exploited the space on either side of the 13-2 defence for most of the game, they look to attack the space in the middle in the 69th minute.

Generally when Quins are this close to the try-line, their cover defenders are primarily the scrum-half behind the ruck and the second last defender. In the picture above, Martin Landajo-circled-has come on for Danny Care and is out of position, prompting Lopez to put a kick into the space behind.

Only an unfortunate bounce prevents Toeava from scoring here.
Despite Toeava’s knock-on, Clermont have a penalty advantage, kick to touch for the lineout and set up to attack once more.

Having won the resulting lineout, Lopez can be seen here looking to where Landajo is. With the 9 tight to the ruck, Clermont go to the forwards one more time before Lopez sets up to kick again.
Although Michele Campagnaro in the 22 jersey makes a good read in this clip, the bounce is better this time and Moala pounces on Lopez’s kick for Clermont’s 6th try.
<->
Following a convincing opening round win over Quins, Clermont travel to Belfast for a Pool 3 top-of-the-table clash against Ulster. If their performance against Harlequins is anything to go by, Clermont are more than capable of kicking on with another Champions Cup win this Friday.
<->
If you’ve enjoyed this article and would like to read more, you can click on the ‘Index’ icon at the top of the page to see a list of all the other articles on the site.
There are also links to the EK Rugby Analysis Twitter account on the top and bottom of the pages if you want to follow any future updates on new articles. Thanks for reading.
EK
