
After three losses and a draw versus Andy Farrell-coached defences since 2016, there was a convincing argument building that the All Blacks attack was struggling against the Ireland coach’s rush-style defence. However, with teams always battling to simultaneously close and open space, good attacking play can often make it appear where defences least expect it. This analysis will look at the build-up to just a few of New Zealand’s 7 tries against Ireland and how they brilliantly adapted their attack to win the race for space against the Irish rush defence.
Before we break down some of New Zealand’s tries, it’s worth first looking at Ireland’s rush-style defence, explaining why they defend this way and how it influenced the All Blacks attack.
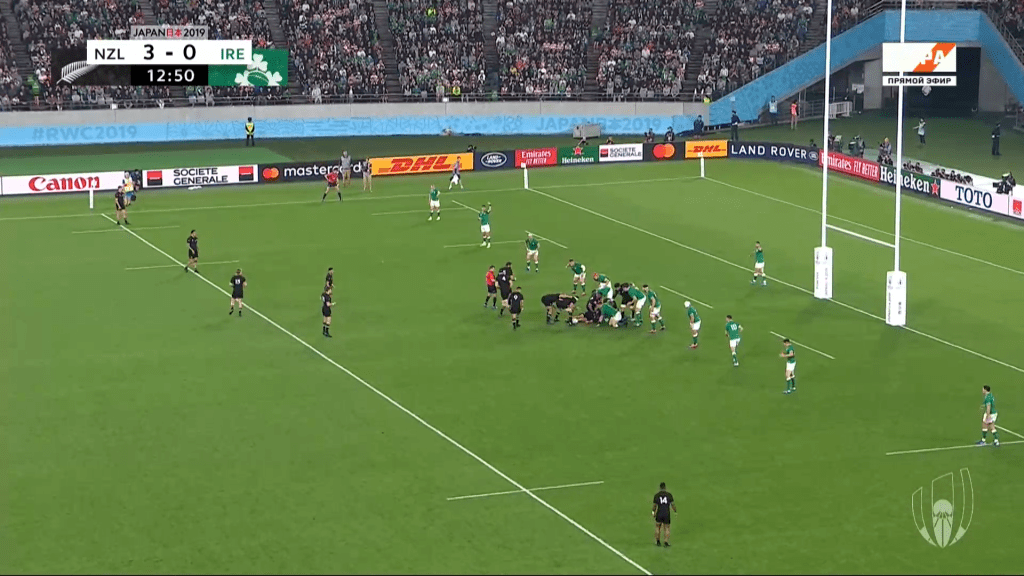
In the picture above, all of Ireland’s 15 defenders are in shot. With a rugby pitch being 70 metres wide, Ireland’s players are covering approximately 50 metres of that width here.
There are three main benefits to this type of narrow spacing in a rush defence:
- it gives defenders more confidence to rush off the line
- it gives the defence more numbers to tackle attackers in the middle of the pitch and slow the ball
- it puts more pressure on the attacking team’s skill-set.
Let’s then take a look at how the All Blacks looked to undermine this defensive approach and create space for their first try.
3-0 up in the 13th minute of the game, New Zealand recover an over-thrown lineout and look to play their way into the Irish 22.

As we can see in the clip above, New Zealand use a series of pick-and-go’s with the forwards; running primarily at the space between Ireland’s first and second defenders at each ruck. A series of long-arm placements by the tackled players also allows the ball to be recycled quickly.
While this might not seem like the most imaginative way of creating space, it keeps Ireland’s fringe defenders honest and takes away their ability and confidence to rush off the line.
Having worked Ireland’s inside defence, New Zealand then look to add variety to their carries while continuing to attack space.
Here, Ireland try to put pressure on the attacking team’s skill-set but Sam Whitelock remains composed and plays a delicate backdoor pass to Aaron Smith to create an overlap.
Whitelock then carries himself off the next ruck. Crucially, the foundation lain by the previous series of pick-and-go’s works in Whitelock’s favour here as Johnny Sexton sits off as the first ruck defender and allows the Whitelock to give his team momentum again in the carry.

After another carry from Joe Moody, Kieran Read is next up. Another variation-this time a dummy pass-makes Rory Best pause momentarily before tackling and allows Read to drive his legs through contact for another gain. This forward drive crucially also pins Best at the bottom of the ruck for the next phase.
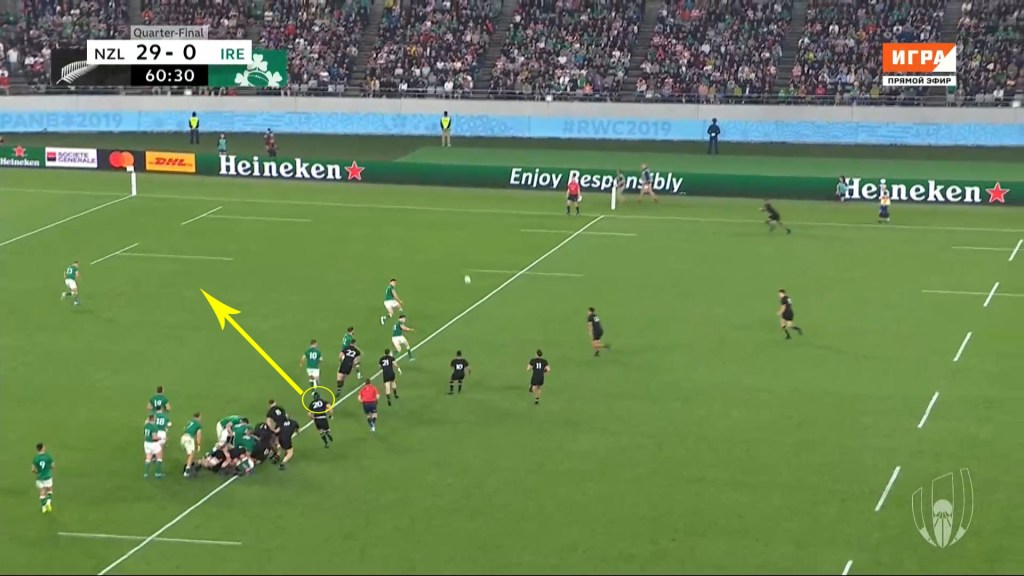
Ireland try to scramble by using the greater numbers to tackle attackers that the narrow defensive spacing gives them and drive back Sam Cane.
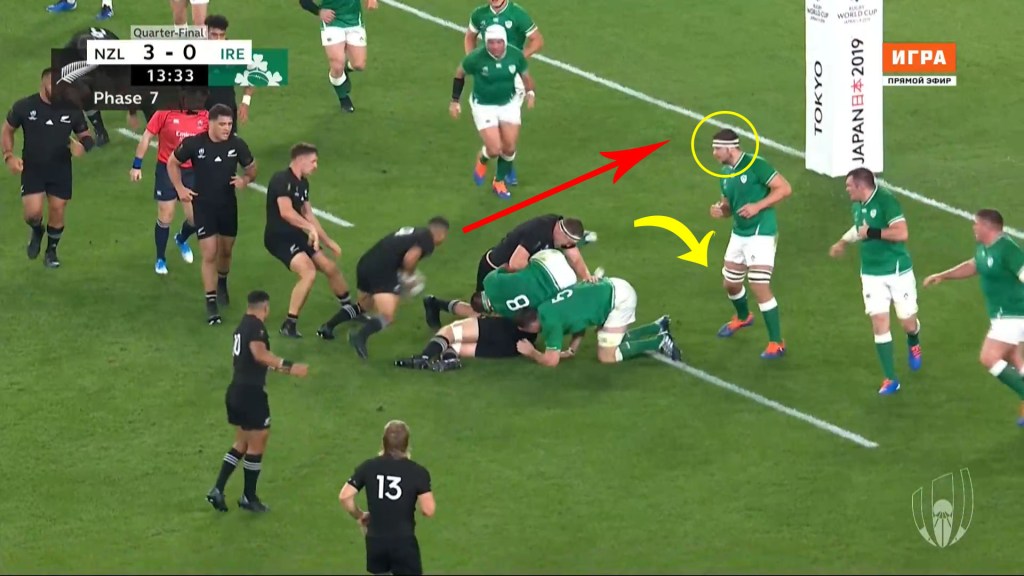
However, New Zealand take advantage of Ireland over-committing. Iain Henderson – circled in yellow – over-folds to the left side of the ruck, the gap opens up and Rory Best can’t win the race for space to stop Smith.
While it’s probably the All Blacks least glamorous try of the game, the build-up to Smith’s first score is a great example of how New Zealand systematically take apart the strengths of the rush defence. New Zealand’s second is another, this time with the backs more heavily involved.
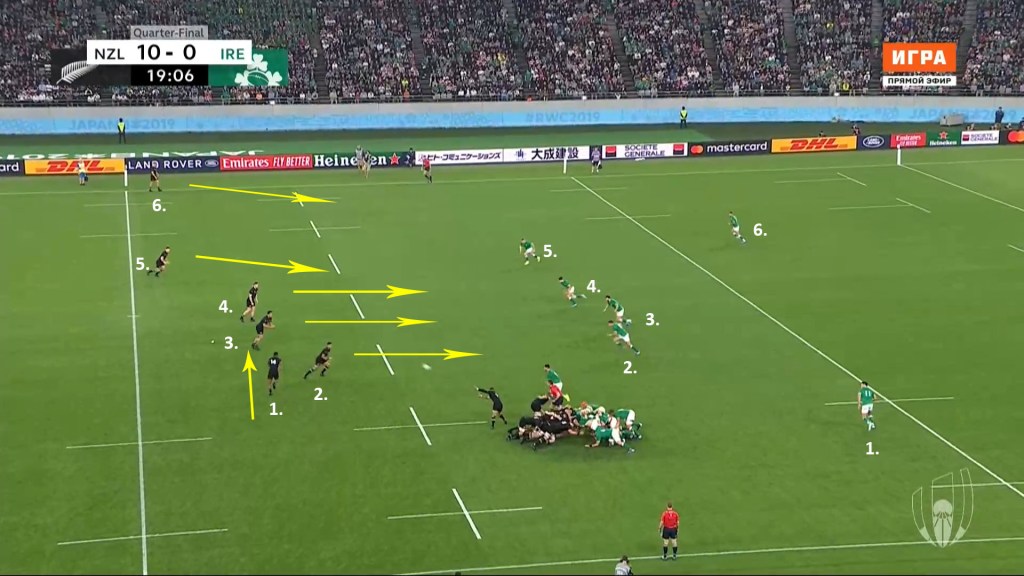
In the lead-up to the second try, Ireland again look to defend narrow off a scrum. Ostensibly, it looks like Ireland have numbered up well here, are ready to put pressure on the attacking team’s skill-set and force a mistake. New Zealand are quite flat in attack, suggesting a possible kick in behind or a carry from the centres.
However, the All Blacks find another option to dismantle the rush defence once more.

In the GIF above, Jack Goodhue does a fantastic job of not over-running the ball while keeping his shoulders square to stop the defence drifting-as does Beauden Barrett by running an angled line towards the ball. Much like with Whitelock earlier in the game, we then see another backdoor pass from Goodhue to beat the rush defence and put Sevu Reece into space on the edge.
Reece straightens his line up from here, drawing Rob Kearney at fullback and passing for George Bridge to take off down the wing. New Zealand’s ability to consistently do the basics well is sublime in this instance and there’s little that Ireland can do other than scramble back to make a covering tackle.
From the ensuing ruck 2 metres out, Aaron Smith’s composure in front of the try-line is exemplary.

Spotting Jacob Stockdale coming in for the hit, Smith delays lifting the ball from the ground to draw a penalty. The scrum-half then takes the space Stockdale has left open to wriggle over for his second try.
Having exploited Ireland’s rush defence with the variety of their carrying, backdoor passes and scrum-half snipes, New Zealand’s fifth try showed more ways that the All Blacks can win the race for space.
Ireland are desperate to win the ball at this stage of the game and James Ryan marginally misses out on winning the ball with his jump. New Zealand pounce on the gap Ryan has left immediately, forming a spear-head at the front of their maul with lifters Angus Ta’avao and Matt Todd to plough through the Irish defence. The length of the New Zealander’s maul makes it impossible for Ireland to get anywhere near the ball once it gets a head of steam up.

Having taken away Ireland’s defensive numbers and confidence to rush off the line, Richie Mo’unga delivers a perfectly weighted kick-pass into the space that is both low and fast enough to catch out the defence’s narrow alignment.
Reece’s evasion skills then allow him to hand-off the recovering Stockdale before wrong-footing Jordan Larmour with a right-foot step to win the collision in the tackle.
While it looks like Matt Todd just happens to be in the right place at the right time to finish the try, it’s also worth noting how he wins his own race for space earlier in the play.
After lifting Scott Barrett earlier at the lineout and originally winning the space at the front of the maul, Todd ends up at the back of it as the ball is transferred to the scrumhalf TJ Perenara. Todd doesn’t let his job end there though and begins running his support line early as the ball is being kicked across to Reece. It’s no coincidence that Todd ends up scoring the try and typifies the approach New Zealand took to exploiting the spaces in Ireland’s defence all game.
Losing games and their number one ranking to rush defence teams gave the impression that the All Blacks attack was suffocating prior to World Cup. However, having got a little more used to the rarefied air, New Zealand now look like they are occupying a space all of their own again. With the type of variation in their game that allows them to win the race for space all over the field, and every other team left in the competition using a rush-style defence, the All Blacks are once more the team to beat heading into the World Cup semi-finals.
If you’ve enjoyed this article and would like to read more, you can click on the ‘W’ WordPress icon at the top of the page to see an index of all the other articles on the site.
There are also links to the EK Rugby Analysis Twitter account on the top and bottom of the pages if you want to follow any future updates on new articles. Thanks for reading.
EK
