
In what sometimes resembles an arms race between World Cups, teams are in a continuous state of building and re-building attacking structures as nations analysts figure each other out. However, with the pool stages of the World Cup now complete, the ever-changing tactical landscape of international rugby has begun to stabilise somewhat with teams looking to the quarter finals. As the dust settles, this article will look at Japan’s 1-3-2-2 attacking shape and how it’s helped them to upset the balance in Pool A.
So, to start things off, what is a 1-3-2-2 and what does it mean? Inspired by football’s use of numerical formations such as the 4-4-2, rugby has adopted the same approach to positioning the 8 forwards in a pack on the pitch.

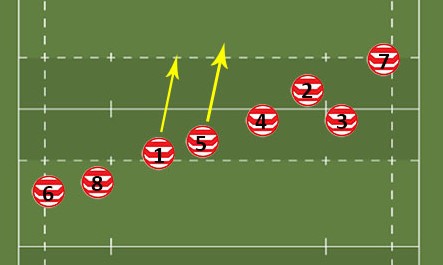
As we can see in the image above with the coloured boxes, the way the 1-3-2-2 formation works in rugby is that it splits the forward pack into four groups of players positioned laterally across the field.
Essentially, the numbers in a 1-3-2-2 formation determines how many forwards are in each group and where they stand e.g. the ‘1’ will stand alone on the left wing, the ‘3’ on the 15 metre line and so on. The idea behind formations, or ‘shapes’, like this is to spread out the forwards, rather than having them all cluster around the ball, and consequently stretch the opposition defence.
As some readers may be aware, there are already two commonly used attacking shapes in rugby called the 1-3-3-1 and 2-4-2 systems. Both are very popular in international rugby because they give teams the relative security of having a balanced number of forwards across the field, particularly in the midfield where the rush defence can be most aggressive.
So why do Japan forgo this balance and put the forwards in a more asymmetrical shape like the 1-3-2-2 does?
Well, firstly, teams have become used to defending against traditional attacking formations like the 1-3-3-1 and know how to shut the ball down in the midfield in these instances. Using the 1-3-2-2 changes the picture for defences a little in that sense.
Secondly, with a pack where no player is taller than 6’5, Japan are not gifted with a host of large players that can play off slow ball at 9; as teams are often forced to do when stopped by midfield tackles in other formations.
As a result, Japan must be more elusive, unbalance opposition defences and play to their strengths wider out the pitch; something that the 1-3-2-2 gives them licence to do.
If we keep in mind the above image of the 1-3-2-2, let’s run the clock forward a few seconds to see how Japan put this plan into action.
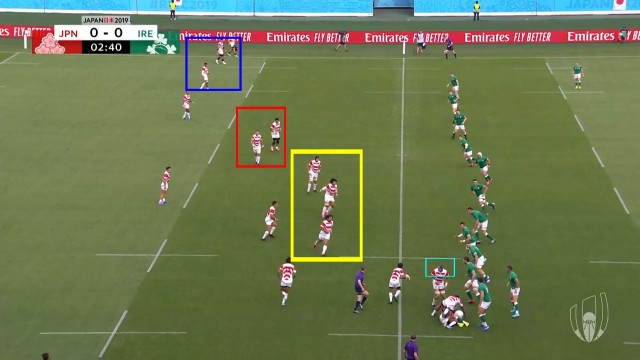
The way a 1-3-2-2 sets up, opposition defences will naturally focus on defending the largest group of 3 players as it’s the most obvious way for Japan to get forward momentum in their attack.
As we can see in the clip above, Japan use these 3 players as a decoy to honeypot Irish defenders and open up a gap for the next pod of two forwards to make a linebreak.
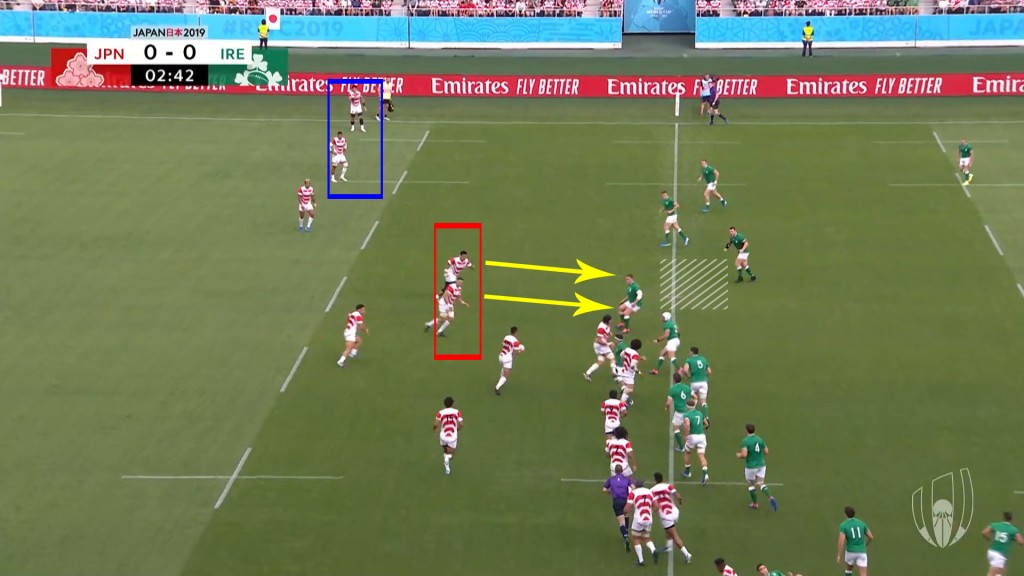
A small but important detail here is the angle that both Luke Thompson and Ji-won Koo run.
Instead of running straight and allowing the Irish defence to drift out wide, both players angle inwards slightly. This is done so that, even if they are tackled or skipped, it still preserves the space for the 2 fastest Japanese forwards on the left wing-marked in the blue box above. Moreover, these ‘unders’ lines unbalance the Irish defensive numbers on either side of the pitch. Japan eventually win a penalty in this instance, showing the value of the 1-3-2-2 early in that Ireland game.
While having a deliberate attacking shape like a 1-3-2-2 can often stifle teams offensively, anyone who has watched the Brave Blossoms play recently will tell you that they are anything but predictable.
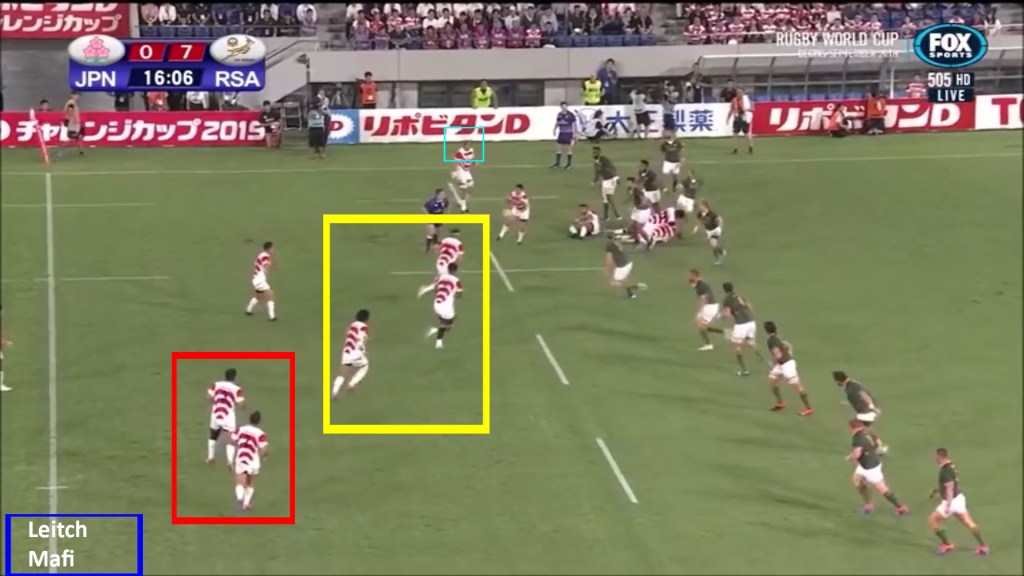
If we look at Japan’s World Cup warm-up game against future opponents South Africa, keep the image above in mind and lets see how Japan look to change the picture in attack in the following GIFs.
Japan start by playing the ball to the edge off a scrum. This stretches the South African defence and allows the Japanese forwards to get into their 1-3-2-2 shape quickly on the open side of the pitch.

Having committed the South African defence to focusing on one side of the pitch, Japan again use the first pod of 3 forwards as decoys, but this time, they also use the first pod of 2 forwards as a decoy too. Their angled runs draw in the Springbok rush defence and releases the final group of Japan’s fastest two forwards out wide in Amanaki Mafi and Michael Leitch.
Leitch swerves into the 22 here before winning a penalty for his team, again showing how the 1-3-2-2 is allowing Japan to keep the ball while creating scoring opportunities from anywhere on the pitch.
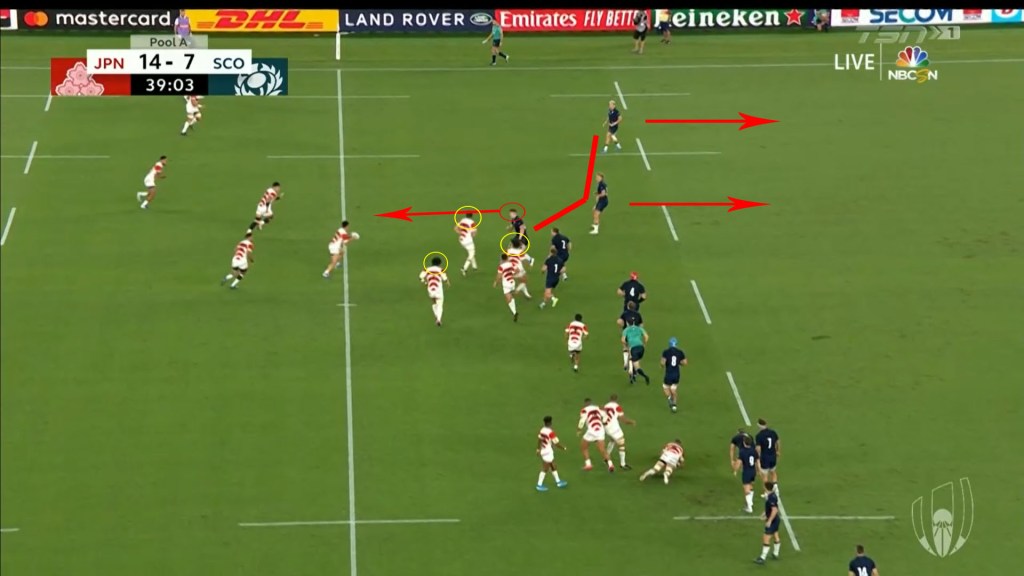
If we move on to Japan’s most recent game against Scotland, once more we see how Japan employ the 1-3-2-2 to unbalance opposition defences, while still being inventive within that structure from game to game.
While most teams would use a pod of 3 forwards to carry into the guts of the Scottish defence here, Japan again look to shift the point of attack and keep Scotland guessing with some lovely hands from Shota Horie to make a linking loop pass to Pieter Labuschagne .
Having established the loop pass a few phases earlier with the pod of 3, the Scottish defence sits off the next time, allowing Japan to this time carry and set up up quick ruck ball again. With the Scottish defence now narrowed, Horie is the ‘1’ in the formation and runs a an angled decoy line to commit more defenders. This opens up the space for Kenki Fukouka to link with his fellow winger in Kotaro Matshushima for a brilliant opening try.
With most teams scoring the majority of their tries off counter-attack, lineouts and scrums, Japan’s ability to create regular point-scoring opportunities within the 1-3-2-2 is a fantastic asset to have. Although any team could start playing in this formation tomorrow, it’s the ability Japan show to improvise within that structure that truly brings the 1-3-2-2 to life.
The second try against Scotland is another great example of this with the pod of 3 in the 1-3-2-2 featuring heavily again.

Horie is outstanding here again, pirouetting out of the first tackle before offloading to set up a chain of passes that leads to a try.
It’s also worth noting that try-scorer Keita Inagaki does excellently to step out of his position as a forward in the next pod of 2, patiently holding his run before running onto the ball at an angle to score.
With the pod of 3 forwards already showing examples of (a) being used as a decoy to be passed behind (b) using a linking loop pass themselves and (c) carrying straight up into the defence, Japan show another attacking option for their third try against the Scottish.

This time out-half Yu Tamura uses option (d) with the 3-man pod; taking the ball in front of the forwards and playing a tunnel pass through the space between them to release the outside backs.
The runs of the pod of 3, plus the timing of Tamura’s tunnel pass, leaves Scotland’s Magnus Bradbury in no-mans land having over-committed to coming forward in defence. As the picture above shows, this disconnect forces also Scotland’s Chris Harris and Darcy Graham to back peddle and give Japan’s edge-attack time to make a decision.
This time ends up being fatal with Timothy Lafaele given three seconds too many to prod a deft grubber kick into the hands of Fukuoka for another score before half-time.

With a team of players that was deemed by many as under-sized before the World Cup began, Japan have used the 1-3-2-2 attacking shape to not only hide their weakness, but also accentuate their attacking strengths. With the good will of a nation behind them, Japan will hope that the 1-3-2-2 can help them continue to unbalance defences and upset the balance of power for a few more weeks yet at this World Cup.
<->
If you’ve enjoyed this article and would like to read more, you can click on the ‘W’ WordPress icon at the top of the page to see an index of all the other articles on the site.
If you would like to support EK Rugby Analysis continuing to make more posts like this, you can donate €2 below.
EK
Support EK Rugby Analysis
If you enjoy what we do and would like to support EK Rugby Analysis , you can click below on your preferred method of payment to donate €2
€2.00

Leave a comment