

While losing twice in one year would seem trivial to most teams, 2017 was the first time in 8 years that this had happened to New Zealand. With both the Lions and South Africa operating with blitz defences that stifled the All Blacks running rugby style, head coach Steve Hansen felt it was time for a change before the World Cup. This analysis will look at how the All Blacks have switched up their attack with the new 2-3-2-1 and 2-2-3-1 attacking shapes ahead of the knockout stages of the tournament.
Before we dive into the detail of the 2-3-2-1 and 2-2-3-1, it’s important to establish what these numbers mean and how the All Blacks apply them on a rugby pitch.
With 8 forwards in every rugby team, coaches look to organise these players into different groups across the rugby pitch. These groups are numerically allocated to different areas of the rugby pitch in what is often called a team formation or shape. Where the numbers are allocated then often tells you where a team wants to attack.
Teams with a 1-3-3-1 shape for example will usually look to punch up the middle of the pitch, whereas a shape like a 2-4-2 has more forwards out wide and looks to attack there more often as a result. With blitz defences becoming used to these two shapes, New Zealand have come up with a new one of their own.
If we look at the graphic above, we can see that New Zealand often look to organise their forwards in a 2-3-2-1 formation. So why do New Zealand position their forwards this way and what does it tell us about their attack?
If we go back to the article’s introduction, New Zealand lost 2 games in 2017 against teams who used a blitz defence that rushed up and pushed back their attack. Indeed, in their two losses in 2016 and 2018, Ireland also used a blitz defence that stifled New Zealand’s usual attacking prowess. If the All Blacks were going to beat the blitz defence, they would need an attacking shape to counter it’s strengths.
The area of the pitch where blitz defences are strongest defensively is from a ruck in the wide areas because, as you can see in the picture above, the whole defence can rush up in one organised line.
For New Zealand to slow the blitz defence, they needed an attacking shape that gets the ball into the middle of the pitch in those difficult situations and does it as quickly as possible because:
- it splits the defensive line either side of the ruck,
- it means that the opposition can’t race up as one cohesive line and
- it then allows the All Blacks half-backs to pick the weak side of the defence and attack the space with their most dangerous players.
With these attacking goals in mind, let’s then take a look at the 2-3-2-1 in action and see how the All Blacks formation achieves this.

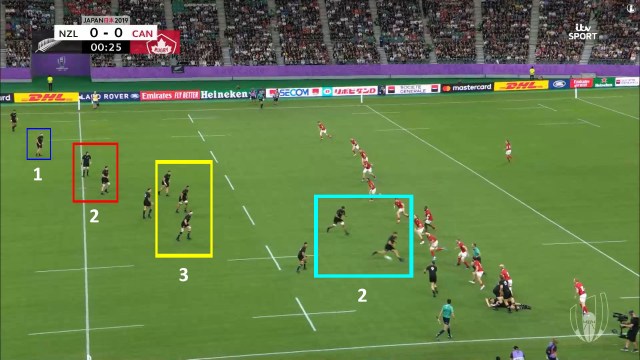
As we see above, the first pod of 2 forwards run an angled double decoy line that staggers Canada’s defensive line. Using these two forwards as dummy runners also buys Richie Mo’unga time to pass to the pod of 3 forwards in midfield. While the pod of 3 don’t make any great progress up the field, the All Blacks have now split the Canada defence and can pick which side is weakest to attack.
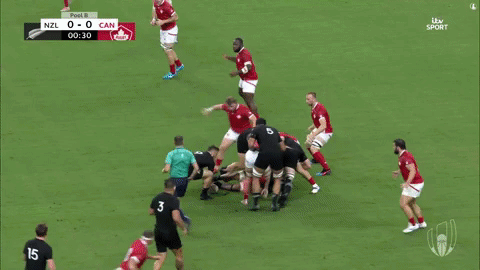
With Canada’s Tyler Ardron over-committing in defence, there is now space to attack on the right as he jogs back. New Zealand spot this quickly and are suddenly into the Canadian 22. With quick ball and the defence on the back foot, the All Blacks can afford to commit 2 forwards to the wide ruck and still bring the other pods to life.

The pod of 3 show their second role here as an option to link play with passes from the crowded midfield to the wider areas. With the defence being drawn in, as we can see in the image below, a quick pass out the back from Shannon Frizell creates a disconnect in the Canadian line as they have over-committed to tackling the pod of 3 forwards.

It’s important to note the running lines of the second pod of 2 here too. If we look at the image above, we can see that this group intentionally angle their runs inwards rather than running straight. While there’s an obvious gap to attack here, in a situation where there is no gap, Matt Todd’s angled run stops the Canadian defence from drifting out to defend the wing. This then preserves the space for another potential attack out wide where the last forward is with New Zealand’s fastest backs.
As it turns out, New Zealand score from the opportunity created by the 2-3-2-1 here after the resulting scrum pushes over the line.
Having established what the 2-3-2-1 looks like and how it works, let’s look at some other examples of how New Zealand’s attack is put in motion.
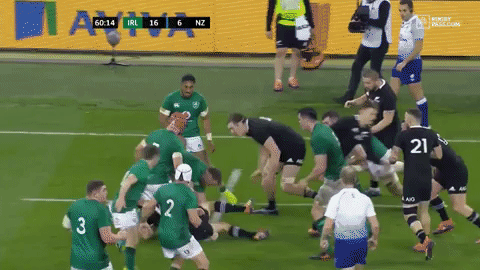
This is the earliest example of New Zealand’s new shape; in their end-of-year tour against Ireland in 2018.
Although they understandably don’t quite get the numbers right at the ruck, the double decoy and pod of 3 forwards still allows the All Blacks to get the ball from one sideline to another and up to the 22 metre line.
Indeed, New Zealand often find themselves in situations- particularly off slow ball in wide rucks-where they have to commit an extra forward to protect the ball. Instances where this ruck ball becomes slow is when the hybridity in the New Zealand’s attacking game appears and the 2-2-3-1 variation comes into play.
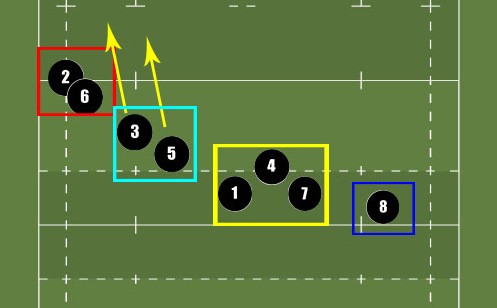
The aim of the 2-2-3-1 shape is to achieve the same effect as the 2-3-2-1 in negating the blitz defence, while allowing the All Blacks to be flexible with the number of forwards they commit to rucks. We still have the pod of 2 forwards running angled runs, plus the pod of 3 forwards in midfield built to survive the initial blitz or move the ball wide.
As we will see in the next example, this also continues to allow New Zealand’s half-backs to then pick the weak side of the defence, bring that last forward into play and attack with their fastest players.
Although New Zealand’s forwards get smashed back here initially, the speed with which the ball is moved to the middle doesn’t allow the Australian defence to set quickly. Moving the ball to the middle of the pitch forces Australia’s open-side defenders to sit off and wait until the cover defenders come into the front-line. This gives the All Blacks time and space to use their dangerous attacking players out wide, kick the ball in behind and score.
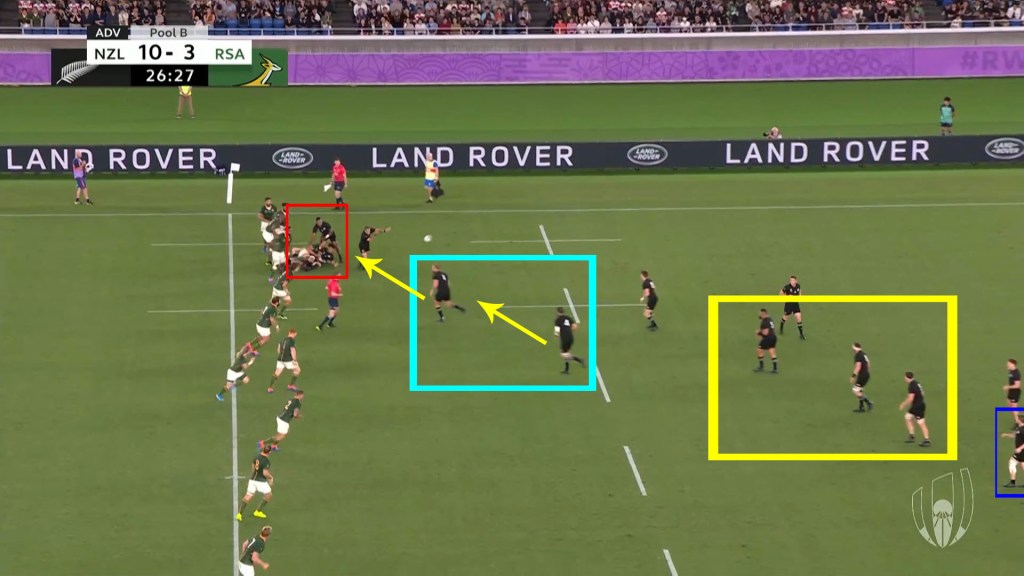
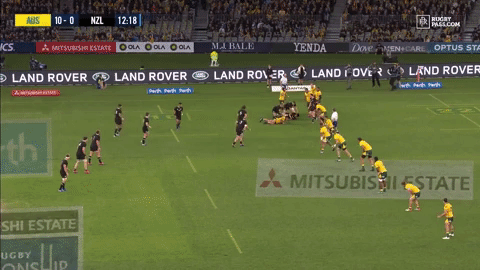
Again, we can see the 2-2-3-1 in action during New Zealand’s pivotal Pool B clash against South Africa. Sam Cane and Ardie Savea have secured the wide ruck and the other pods have formed up outside them. Aaron Smith passes behind the double decoy and Beauden Barrett takes the ball into contact where he is supported by the 3 forwards in the yellow pod.

With the midfield ruck now set up, New Zealand once again have time to pick the weak side of the defence, bring that last forward into play and punish South Africa out wide. Dane Coles does a great job of distracting two defenders here and offloading into space. Centre Anton Lienert-Brown can then exploit the mismatch and power through the line for New Zealand to score.
After opposition blitz defences somewhat stifled their running game and triggered an uncharacteristic number of losses, the All Blacks were compelled to reshape their attack ahead of the 2019 World Cup. That involved a bedding-in period for the new 2-3-2-1 and 2-2-3-1 hybrid formations , as well as some middling results over late 2018 and The Rugby Championship. However, with the experimentation period now over and the All Blacks averaging a tournament-high 52.3 points per game, New Zealand look to have their attack back on track just in time for the quarter-finals.
If you’ve enjoyed this article and would like to read more, you can click on the ‘W’ WordPress icon at the top of the page to see an index of all the other articles on the site.
There are also links to the EK Rugby Analysis Twitter account on the top and bottom of the pages if you want to follow any future updates on new articles. Thanks for reading.
EK

Most informative rugby article ever! Kiwis will be hard to beat.
LikeLiked by 1 person
Thanks very much! Glad you enjoyed the read.
LikeLike